xDrip and xBridge Build Instructions
- Category: Hacking Diabetes
- Hits: 25025

I have been meaning to make this post for some time as I always struggled to find clear and easy to follow instructions on how to build an xDrip or xBridge devices. For me battery life and size are key, therefore this build uses a high capacity battery and fits a small form factor of a Tic Tac box.
These devices listen out for the signal from a Dexcom G4 CGM and relay via Bluetooth to your mobile phone with the xDrip app installed. xDrip is my CGM source that I sync directly to HAPP and Nightscout.
Parts
You should already have
- Android mobile phone with xDrip or xDrip+ installed
- Soldering kit
- Helping Hands - they are
really , really helpful
Common Parts
- Wixel Programmable USB Wireless Module - picks up the signal sent from the Dexcom Transmitter that contains the CGM reading
- Bluetooth Low Energy CC2540 HM-10 Module - connects to your mobile phone
- Polymer
Lithium Ion Battery (3.7V, 1Ah) - I get around 3 days from this battery - Adafruit Micro Lipo Charger - charges our battery
- SPDT Slide Switch - having a switch allows us to solder the battery direct to the charger to save space and gives us a way to turn the device off / on
- Wires
- Mini USB Cable - for loading the firmware onto the Wixel
- Tic Tac box - what else are you going to put your xDrip / xBridge in!?
xBridge only
xDrip or xBridge?
xBridge is an extension from the original xDrip design that also provides battery level readings and power saving features.
What one should you build? Both!
While it's great to have the power saving features and battery level data from xBridge, it's nice to have a second unit in the event of issues and troubleshooting. Out of the two xDrip is easier to build, I suggest starting with an xDrip first.
Let's Build!
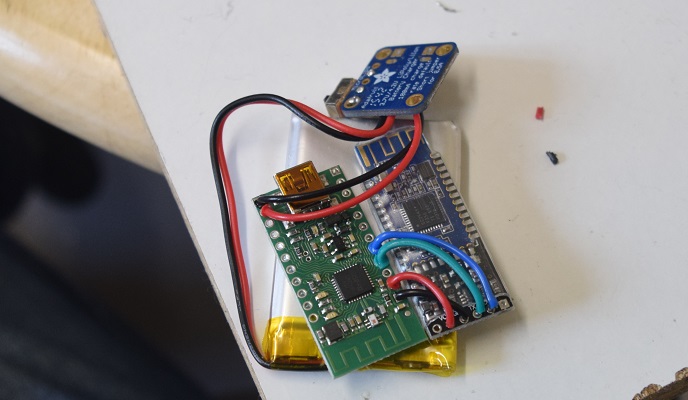
Step 1 - It's all about size
We need to remove unnecessary connectors from the Bluetooth module and Adafruit charger. This can be done by heating the solder points and pulling the pins out with some pliers, I recommend removing the plastic parts on these pins first. The end result should look like the below...


Step 2 - Charger, Switch & Battery
Far too many times I have seen the battery soldered direct to the charger, while this is compact it means there is no way to restart the device - this is useful especially when troubleshooting.
Below is a Circuit Diagram for adding the switch and battery along with a photo example. Note that the switch is connected directly to the Charger to save space, its 3rd leg is soldered to the screw hole to make it more secure.


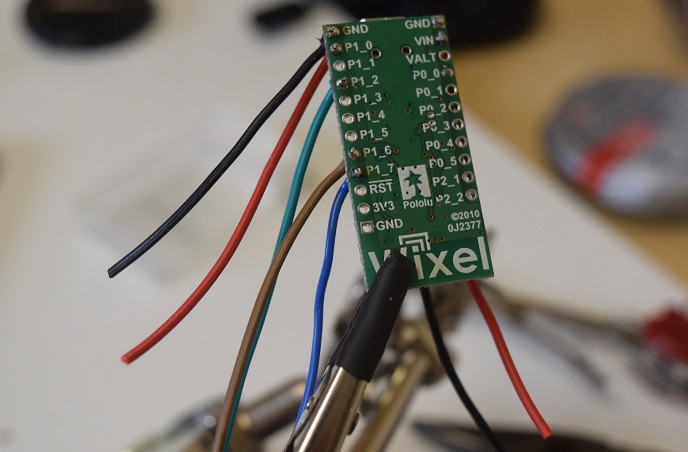
Step 3 - Circuit Diagrams
This differs
Start with the Wixel and Bluetooth Module first, while we want to keep the joining cables short, be sure to leave a few millimeters spare as "wiggle" room.
Then the Charger and Switch, here we need a little extra slack in our cables so that we can maneuver the charger and battery when placing inside the Tic Tac box.
A: xDrip


B: xBridge


Step 4 - Firmware & Test
We are almost ready to rock, but
A: xDrip
Each xDrip firmware has the Transmitter ID hard coded into it. The best way to build a new firmware with your Transmitter ID is by using the xDrip Kit Wixel Firmware Generator.
B: xBridge
xBridge firmware can be downloaded directly from Github, right click "xBridge2.wxl" and save it to your computer.
*note* Comment feedback from Andy says that at times this results in a corrupted download, to fix this download the full GitHub repo and extract the file.
xBridge has a power saving feature that turns off the Bluetooth connection to your phone between readings, some phones have issues with this and struggle to pair again with the xBridge resulting in missed readings. Personally, I turn this feature off by following the below steps...
- Download Putty, we will use this to connect to the Wixel
- Connect the Wixel to the computer and open the Wixel Configuration Utility. Note the COM port the Wixel is connected to, now close Wixel Configuration Utility
- Open Putty, pick Serial and enter the COM port you noted earlier. Click the button "Open" to connect to the Wixel
- Once connected copy and paste the following letters and then pressing enter...
- B - Turns off Bluetooth sleep
- S - Will show you the Wixel config, this will confirm
Step 5 - Tic Tac it home
To protect the battery from any sharp protruding parts from the circuits I suggest placing a thin piece of plastic between them, anything will work for example a yogurt pot lid. Position the parts as shown in the image below, you should have enough slack cable from the Wixel to charger and charger to the battery to help position things, once in

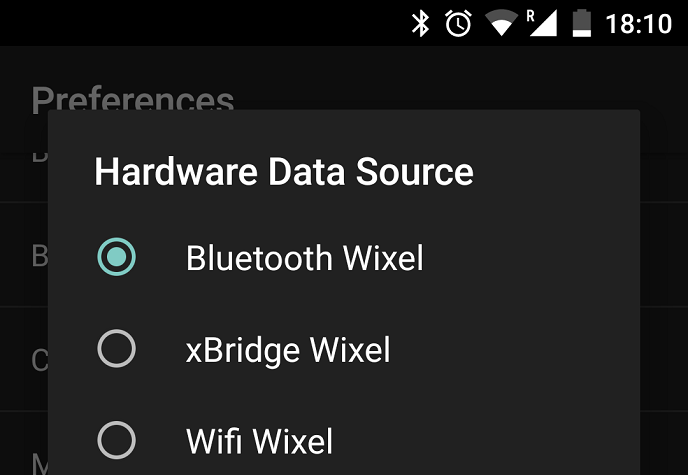
Step 6 - Software Configuration
In xDrip or xDrip+ pick the correct "Hardware Data Source" for the device you have built.
xBridge Only
In xDrip or xDrip+ set your Transmitters code.

Credits
- xDrip on GitHub
- xDrip+ on GitHub
- xBridge on GitHub
- xBridge documentation - highly recommended read (note misprint on page 3, "10k/2k7" should be "10k/27k")
- My original high-res build images
Like this? Email me future posts!
Disclaimer
The contents of this site
